In today’s article, we will be learning an important hardness test and its name is the Rockwell hardness test. It is quite different from other prominent hardness tests like Brinell and Vickers hardness test. This test gives you the direct reading of the hardness of the material in just a few seconds. The one important part of this test is that it gives the hardness value depending upon the penetration depth of the indenter inside the material.
Let’s take a quick look at the History of the Rockwell hardness test:
Stanley Rockwell and Hugh Rockwell invented the Rockwell hardness test together. Both of them were from Connecticut, the United States. This entire test depends on the differential depth hardness measurement process. On the basis of this differential depth measurement, they both also discovered the Rockwell hardness tester which measures the hardness accurately.
Indenter used in the Test
In the Rockwell hardness test, tungsten carbide balls or diamond which is in the shape of the square pyramid are used. Sometimes, the steel ball is also used as an indenter. Even though depending on the application, you may have to use other indenters. Thus, the choice of the indenter is not ideal in the Rockwell hardness test but most of the times carbide ball or diamond are used as the most common indenters.
Rockwell Hardness Test Procedure
Steps that you have to carry out during the Rockwell hardness test:
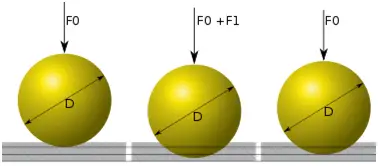
- First of all, you have to apply a minor load (f0) on the indenter. This minor load is set to be 10kgf ideally. This minor load is also called as the zero load. Minor load helps to establish the reference position from which the further measurements are to be calculated.
- Now, a major load (F1) is applied in addition to this minor load. Due to applied load, the indenter penetrates inside the material.
- After 10-15 times, the major load is removed and the minor load is still applied. After 15 seconds of removing the major load, measurement is taken. The depth of the penetration of the indenter from the reference line gives the hardness of the material.
There is also the Rockwell hardness tester machine which gives you correct reading with almost no errors. The machine consists of the scale which gives the hardness of the material. In most of the applications, this machine is used.
- Types of plastics – That You Must Know?
- What is Powder Metallurgy – A Modern Manufacturing Process
- 37 Types of Hammers that You Don’t Know?
If you use the hardness using the Rockwell hardness tester then, there is no need to do any type of manual calculations.
In this test, hardness is given by

- Here, d= depth of the penetration of the indenter from the reference line or the zero-position line
- N and s are nothing but the scale factors which depend on the type of the Rockwell scale.
Now, you may be thinking about what are the types of the Rockwell hardness test? It is interesting to know that there are more than 30 different Rockwell hardness scales are there. And each of these scale has different values of the N and s. HRA, HRB, HRC, HRD, HRE, HRF, etc. are the different types of the Rockwell hardness scale.
HRB and HRC are the most common type of the Rockwell scale while all others are used depending on the applications.
Let’s take a quick glance at some of the Rockwell hardness scale and their N, s values as well as the type of the indenter used in those scales.
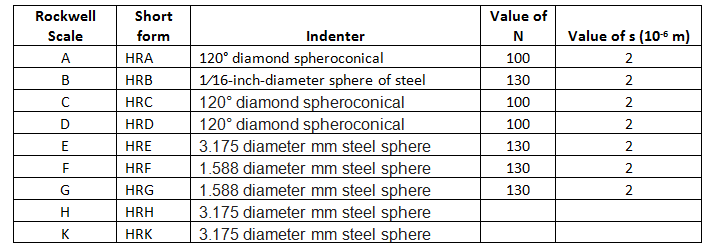
So, these are some Rockwell hardness scales.
Here, one point to note down is that the value of the initial load is 10 kgf in case of the Rockwell hardness test and it is 3 kgf in case of the superficial Rockwell hardness test.
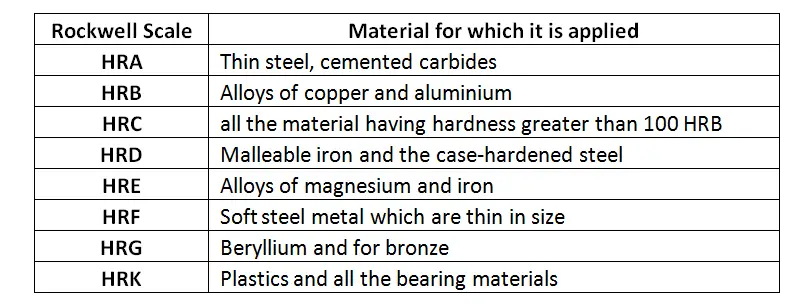
Let’s see for which material which Rockwell hardness scale is used.
Advantages Of Rockwell Hardness Test
First, start with the advantages of this test. So, following are the benefits
- In this test, there is no need for carrying out other processes like grinding, embedding, etc. This test also doesn’t cost any amount of money.
- As above stated, the hardness value is easily calculated and there are no complicated calculations are involved.
- The Rockwell hardness test requires a very short time to carry out and it gives the required results more efficiently.
Disadvantages:
- The material surface must be exactly filled, It must be not convex. Even a slight convexity results in the errors in the readings.
- Also, the material of whose hardness is to be determined must not be impure.
You must not perform this test at the edge of the material. It is advisable to implement this test at the center of the workpiece. If you are using the diamond indenter then, remember to keep an angle of 22º between the inclined edge and the surface of the material.
Watch the Video For Better Understanding about the Test.